
AB
Diagon Alley
Shop
31/1/2020: Officially the project starts. I had been thinking of ideas for this shop during the Christmas holidays, as we were given a short summary of the project before the last term ended. I've settled on the idea of a magical clockwork shop: in the introductory chapter of 'Harry Potter and the Philosopher's Stone', Albus Dumbledore reads the time using a watch, which is described as:
'Golden...very odd...it had twelve hands but no numbers; instead, little planets were moving around the edge. It must have made sense to Dumbledore...'
This intrigued me because magical machinery is something that is seen elsewhere in Harry Potter, such as things like the Sneak-O-Scope, but I can't recall seeing a place anywhere in Diagon Alley in the films, nor reading about it in the books, that describes a shop specifically for it. I also thought that since clockwork is such an intricate craft, even magical clockwork had to have a skill to it: it could even tie into the magical Time Turners that we see in 'The Prisoner of Azkaban'.
My shop idea, therefore, is going to be themed around clocks: looking at the visual style of Diagon Alley, that also means I will be making the shop look Victorian and somewhat higgeldy-piggeldy. I think the best overall aesthetic for the shop will be a blend of magic and steampunk, and I'll put some standout references below. I think my next step is going to be sketching some ideas for signs, names and motifs, as well as the overall shop.
Speaking of which, I was assigned a corner shop slot, with my neighboring shop being all about magical plantlife. I spoke to my classmate, who'll be making this shop, and I think it'll work quite nicely: I can even imagine our two shopowners having a rivalry of sorts. Imagine:
PLANT: 'Oi! Whatcha think yer doin?'
CLOCK: 'I, my dirty-fingered fellow, am arranging a vampire-repelling sundial.'
PLANT: 'Yer cuttin down my sprog-blooms, is what yer doin!'
CLOCK: 'Well you shouldn't have grown them in the perfect spot to put a sundial.'
PLANT: 'Where do ye think plants GROW? In the bloomin DARK??'
Etc.
02/02/2020: Having settled on the overall aesthetic, I've been focusing on finding references for the shop. In the project brief we were told to use 'Dickensian' buildings: this more refers to the specific era when Charles Dickens was alive, as opposed to a style of architecture. I've therefore been looking specifically for 19th Century London buildings, along with general 'Steampunk' machinery and aesthetics.
I've put some of the references I'll be using below, along with some initial sketches of my shop. Considering I have a corner shop, I can be more creative with how the windows and walls have been built, and I already rather like the potential look of the place: I particularly like the rounded-tall-narrow look, as it makes the shop look more imposing and formal without actually making the shop look out of place. My whole reference sheet is here.

This drawing, called 'Over London by Rail', by Gustave Doré, was taken from an article about the horrible living conditions of London's poor. I decided to use it as a reference partly because it does a wonderful job of showing the roofs and chimneys, but also because it is a handy guide as to what not make my shop look like.
These buildings are cramped, small and uncomfortable; J.K.Rowling's fantasy world is meant to be a far cry from this real world squalor. I can use this as a guide to ensure my shop does not end up looking too close to this estate.
This is a photograph of the Shambles street in York, a location which seems to be an inspiration for Diagon Alley. This photograph was taken by Peter K. Burian and used on Wikipedia (which is conveniently where I took it from).
The Shambles itself was apparently a market in the 14th century, before it was moved. The overhanging floors of the buildings are a motif which can be seen in some of Diagon Alley's buildings, and the shop signs seem to be similar, too.


This clock is a model being sold on eBay, and a few other websites, which is apparently modelled to be Steampunk. It seems to be suitably steampunk to me, although I do notice a lack of anything steam-related on its frame.
I intend to use this as a reference mainly for the kind of stock the shop will sell: I won't need to model the whole interior, since I'll be doing the shop on my own, however I will need to create some merchandise for the window, and I need a guide as to the overall aesthetic of the shop. This clock, I feel, is a good guide: it isn't magical looking, but as a base model it is both functional and stylised, and gives me a few ideas off the bat (for example, the doorway into the shop could be round, or craved to look like cogs, or actually be made of cogs etc).
If I was going to make this clock magical, I would follow the same kind of description Albus Dumbledore's watch has: I would add more hands, and perhaps have a star or a planet instead of the bell. The difficult part is making the thing magical without completely obscuring its purpose: a magical watch still has to look like a watch. I'll put some sketches of merchandise down below, with my sketches for the shop.


04/02/2020: I followed up my sketches, which were done pretty on the fly and without a great deal of planning, with some more thought out 'plans'. I tried to use more correct perspective and an equal amount of space, and I drew some basic era-appropriate doors and windows to arrange on the buildings as I saw fit.

Visually, I do prefer my more basic sketches, but these are much more helpful in terms of considering space, and how the model will look while constructing it in Maya. At a basic level, the shop will be the same shape as the other shops on our Diagon Alley, so any variations will have to be specific and fit into a certain variety. My basic freehand sketches, I feel, strayed too far, and these are closer.
Out of these three, my favourite is the central one: the one on the left feels too basic and could be the design for a house, while the one to the right feels a bit too piecemeal. Diagon Alley houses and shops have a little more leeway to be piecemeal, of course, but it can go from charming to ugly quite easily.
The central one could definitely be improved, but a watchmaker's shop would need to be well lit to both show off the merchandise and to illuminate the workspace: this fits the central design best. To improve on this, I would make the window 'columns' more circular, and have the front of the shop be an overhang over the door. I also think I would have the overhang jut out at a slightly odd angle to the side, to give it a more jumbled and magical look. I'll make a number of other designs based on this starting point, and I'll update when a favoured polished look has been found.
08/02/2020: Remember when I posted that I'd put more designs below once I'd refined the look? Well, as it turns out, my teacher had other plans.
During the lecture yesterday, we as a class were given an hour to create a blockout of our shop, which we could then spend the next hour porting into VR to assess visually. This did come as a bit of a shock but, luckily, I remembered my rough designs and I was able to create a completed rough blockout within the time limit.
The time limit and the unexpected task was, in all honesty, a pretty good idea: it forced everyone to buckle down on what they wanted their shop to look like, and immediately call on their knowledge of reference and scale. For me, for example, I knew I wanted a long cylindrical window, and looking at reference images I knew I would need a fairly big chimney, etc. My final blockout after the hour was up was this:


I decided to start with modelling the generic tall, thin Victorian London building: easily done by just making a rectangle and stretching it out, then rotating a cube 45 degress and putting two oblong rectangles atop it. I added another rectangle and three small cylinders for the chimney, and then I was basically free to customize.
I decided that the doorway would be easiest to model, given the time limit, on one side of the building. Thinking about the practicality of this design now, as I write this post, it's actually a pretty good idea: it gives more floor space to the interior, and with the long cylindrical window showing off the merchandise and letting in light, the shopkeeper can put as much of his stock on display as they want.
After the time ran out, my blockout was exported and downloaded into Unreal, and I was able to get a view of it in VR. I was in the VR room with my friends Emily and Sasha, and my Diagon Alley neighbour Josh (the man who will make the shop with the plants). We all had a bit of a laugh actually setting everything up, especially when Sasha's controllers connected and she wailed 'Ohhh I have FINGERS?!' When everything was set up, I got a look at my building, and I was rather happy with how it had turned out for such a rough concept. I sadly didn't get any pictures of me, but I got some pictures of my teacher also having a look at the shop in VR.

This picture shows the building on display in Unreal Engine, before it was displayed in VR. The engine is really helpful for actually seeing the scale of the model: in my case, I hadn't quite got the height and size of my blockout right.
My idea for scale wasn't too far off, but the building was too tall and the doorway was too big. The funniest thing for me was that the front step came up to my shin, and to show my comedic mastery I nearly fell over while pretending to trip over it.
This picture is of my teacher Jon, who has just realized how tall my shop is.
Along with the accompanying 'woah', I got the point pretty clearly: the shop was not quite proportional. I was able to try on the VR a second time and made detailed notes on what to correct.
The main fixes were needed for the roof and the doorway, as once those were to scale the rest of the blockout could nicely fit in around them. The roof would dictate the height of floors and windows, and the doorway would indicate the relative size of people.

I spent the next day working on said corrections. I have to say, I was glad I had the foresight to keep a separate version of the blockout where I hadn't merged all the components together, otherwise moving the stuff around would have been such a nightmare. I moved all the sticking out parts down a certain amount and pulled the top of the main building down. The roof I kept the same size, I just moved it down a bit to rest on top of the main building again. I then shrunk the rectangles framing the door, and moved them so they sat in roughly the interior of the doorway I'd had before. The final tweaks were to the large cylinder window: I pulled the base of the window down to the ground, because I felt it looked more stable and matched a style I'd seen on the Ollivander's shop from Diagon Alley.
The tweaked version looks like this (with a comparison):

Left: The tweaked blockout.
<--------------------
Right: Comparison of the two blockouts (first on the left, tweaked on the right).
-------------------->
14/02/2020: This update has been a little bit coming, but I think it's worth it.
Last post, I had tried to adjust the scale of my building to be less 'towering' and 'skyscraper'y' to be more realistic in the setting of Diagon Alley. I had originally thought that my observations in VR, by putting my building into Unreal Engine, were accurate, but I tried a different method this week and I completely re-evaluated my choices.
As a class, we were given an .FBX file of a scale man (in fact I'm pretty sure the man is the same as the default avatar in Unreal Engine), which when put into Maya measures about 1.8 metres (assuming the squares on my grid were in fact metres, but I'm fairly confident they are).

This meant I could use the scale man to measure the size of my shop, and the result was not what I had imagined.


The scale of my shop was way off. I hadn't used this man as a measure before and now I see that that had been a mistake.
For comparison, I'm about 5 ft 10 inches tall, or 1.8 metres (so the same height as the scale man), and when I stand upright in my bedroom I come to a little over halfway up the height of the wall. On my build, as you can see in the screenshots, the man came up to half the height of the doorway, which should be much closer to the height of the man, and the first floor was nearly three times his height.
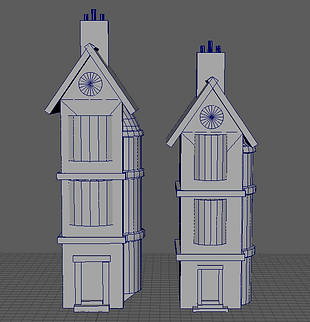
This made me realize that my adjustments hadn't been enough, and I needed to rescale. I brought the height of the whole blockout down until each floor was about twice as tall as the man, and re-sized the windows and doorway to match. When I was finished, I realized that actually my worries about the building being too thin or narrow had been unfounded: the scale of the building had thrown off my perception, and actually there would not be as much of a problem.
Here's a comparison of the three blockouts: from first, hurried assembly, to fixes made from VR, and finally fixes made with a scale model.

To double check the scale of my shop, I asked one of my neighbouring shopkeepers to send me an .FBX. of their shop, which had also been cross-checked in VR and with the scale man. I imported the model into Maya and got this result.

For some reason, importing her model into my Maya blew away the main building and the cylindrical window of my blockout: it isn't shown in the screenshot, but the rest of the shapes ended up scaled to a ridiculous size and transformed to the very edge of the screen. I'm going to assume this was a glitch in the rendering, and hope it doesn't corrupt my file: it's all backed up anyway, so there shouldn't be a problem, and the result was what I'd been hoping for.
Both my shop and the neighbouring shop matched in height, and that was the encouragement I took to assure myself that the blockout was now an accurate size. If nothing else, even if our shops were both somehow sized incorrectly, we would look believable together.
I then moved on to the next step of my modelling, which we had had a lecture on earlier. We were told to begin creating 'modular kits': sets of assets which can be repeated and tweaked to build a level. In the workshop, we were instructed to make a modular kit for a dungeon: in that time, I made a set of torch sconces and chains. After adjusting my shop blockout, I decided to do the same for my shop.
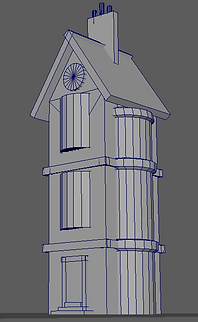
The kit I have so far for my shop is pretty bare: it consists of a pair of frames for windows, and nothing else. However, adding these to my shop after refining the structure and shape of the blockout looks surprisingly good to me! This is my shop after adding more detail, so far.

Looking at the shop now, I feel much happier with it. It looks tall enough to be three-storey, wide enough to actually be habitable, and the detail on the window frames makes it much easier to believe it is era-appropriate.
I think the next step will be adding more detail to the walls, as after all, no shop is completely flat and bare, and I think a Diagon Alley shop would be a bit more chaotic than the rest of London. And, of paramount importance...is to make a SIGN! This shop still doesn't even have a name!
26/02/2020: Okay. It's been quite a bit: let me explain.
I've been focusing on my other assignments to make sure they were good quality: I DID work on this shop, but each edit I made was small, and I didn't feel like it warranted a blog post (it would only be something like 'I made this window blockout' etc.)
The sum of my scattered workings is shown below: on the left are the different window frames I used on my blockout, in the middle is the windows themselves, which I extracted and edited, and on the right is the roof and stairs I built over the blockout, with the idea that they would be at least the first attempt at the real models.

It's a bit of a mess in this screenshot, but it's proven quite helpful. The windows that I extracted from the blockout, I had originally planned to simply refine and put into the modular kit: however, after building the new roof, I've reconsidered. I also looked up a good deal of references as to how modular kits are built, and the methods of construction all seemed to agree that any windows or similar changes in shape were built into the walls, a bit like a LEGO piece. However, with the windows extracted, I can now easily use them as references for scale when I eventually do build my modular kit.
Speaking of scale, the main update for this post is what I've done with the main building. I took the idea of making new walls from scratch for the modular kit, but I didn't have a reference for how long or tall the pieces should be. I therefore made a small cube, stretched it out, and got it to match the different sides of the wall. I then copied it up and made smaller walls to map out where the gaps between windows and floors were. The final result looks like this.

The lines running across the building are vital to my 'plan': I can build my modular kit pieces to match the heights of the lines, which would save me a lot of time otherwise (and potentially some rather ugly errors). To make it even easier for myself, I made a texture for the 'plan', and while I wouldn't call it pretty, I'd say it's effective.


With this in place, I can focus on building my modular kit in earnest,with a solid reference for how tall objects should be, and I can use my existing building as a reference for where parts end. I'm quite excited to get to it!
Still no sign, though. I will get that done. The mystery of when, however...now that will just have to stay a secret. Totally not because I keep forgetting.
27/02/2020: I have started to build my modular kit, and it's actually pretty fun!
I've been going at this with a focus on making sure everything is as precise as possible: I'm trying to get the walls to match closely to the walls of the blockout, and for the size of each wall segment to give it enough room to fit on a window, a door or a set of stairs.
As it is so far, the kit doesn't have much in it, but I will defend myself by saying that that is because I spent a long time on each segment trying to make sure it was a good size. I started with the corners, and that was rather fiddly, but once they were sorted it was fairly easy to simply pull and resize pieces from them.
My plan is to make sure the pieces all fit onto the blockout, and then reposition them elsewhere in Maya's interface so I can UV and texture them. I want to ideally be able to map the same texture onto multiple pieces by stacking the UVs, as otherwise they wouldn't be a modular kit: just an assembly of very similar unique pieces.
My construction so far is below:

And to showcase its accuracy, of which I'm pretty proud, here it is with the reference:

28/02/2020: Progress has been made, and it's been pretty awesome!
The lecture we had today was fairly concise: we were tasked to create a compact texture and plug it into Unreal, really to just ensure we could tackle textures when we reached that stage in our builds.
After doing that, my friend Emily and I were given a pretty exciting task: we were put in charge of keeping the master files of our group's Diagon Alley shops! This involved us both going around the rest of the group and collecting their .fbx files, which we then took away and built into the plot that our lecturer had made beforehand. The reason it took two of us was because each street had 12 plots, and our group numbered at least 17: this meant that some plots had been taken twice.
Once we had done that, the Holders of the Masterfile took the files to the VR suite and booted them up in Unreal. I have to say, it looked really good: our lecturer ran to gather the rest of the group and show them. It was a pretty damn cool moment.

I didn't get a very good picture of the street itself, but I can show what my masterfile looks like. Emily is in charge of the more complete file, but mine is probably going to be merged with the 'leftover' builds in other groups: I suppose I'll have to grit my teeth and struggle through making a beautiful original scene with shops from the Ravenclaw and Slytherin groups. I'll be sure to complain the whole time.


After this was assembled, I took to advancing my modular build. I can say that I am pleased with its progress: the individual pieces are detailed and fit together well. I'm actually particularly pleased with the large downstairs window: I didn't plan out how I was going to model it, I went more on a limb, and it seems to have worked out well.

Next step is ensuring that I am not making or using unnecessary loops or vertexes, as these will add to the data needed to render and put unneeded strain on the PC, and just building up on the walls. However! I am pleased with my progress so far, and I'm so looking forward to seeing the street with everyone's completed builds!
It's going to be awesome.